Author Archive for: bermmerb

[Fixed] ZFS zpool disappear after reboot [ubuntu]

08 Nov
November 8, 2019

After kernel upgrade, ZFS couldn’t start, but some process create some file in the mount point. So after that ZFS can’t start the process ever again. Here’s how to fix.

1. disable service zfs.target and restart.

user@ubuntu:~$ sudo systemctl disable zfs.target

2. after reboot delete or move data in mount point to another location.

3. enable service zfs.target and restart.

user@ubuntu:~$ sudo systemctl enable zfs.target

4. after reboot move data back.

[Splunk revision update] Update splunk version ubuntu

19 Oct
October 19, 2019

1. Download and update using dpkg -i <splunk package>.

user@Lnx:~$ sudo dpkg -i splunk-7.3.2-c60db69f8e32-linux-2.6-amd64.deb 
[sudo] password for <user>: 
(Reading database ... 235721 files and directories currently installed.)
Preparing to unpack splunk-7.3.2-c60db69f8e32-linux-2.6-amd64.deb ...
This looks like an upgrade of an existing Splunk Server. Attempting to stop the installed Splunk Server...
Stopping splunkd...
Shutting down.  Please wait, as this may take a few minutes.
..
Stopping splunk helpers...

Done.
Unpacking splunk (7.3.2) over (7.3.1) ...
Setting up splunk (7.3.2) ...
complete
user@Lnx:~$

2. Update and start service.

user@Lnx:~$ cd /opt/splunk/bin/
user@Lnx:/opt/splunk/bin$ sudo ./splunk enable boot-start
Do you agree with this license? [y/n]: y
Perform migration and upgrade without previewing configuration changes? [y/n] y

3. Restart Splunk service

user@Lnx:~$ sudo service splunk restart

4. Visit splunk url on host.

http://127.0.0.1:51546

[PVE 6] Add proxmox storage.

14 Oct
October 14, 2019

Here is how to add harddisk into proxmox storage pool.

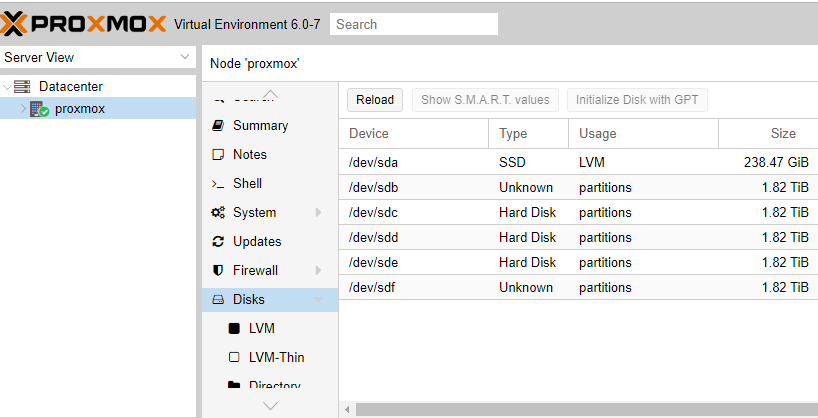
1. After we connect new hard disk to our host. Verify attached harddisk in proxmox.

2. Format each harddisk. We will add sdb – sdf to our new storage pool.

root@proxmox:/# lsblk
NAME               MAJ:MIN RM   SIZE RO TYPE MOUNTPOINT
sda                  8:0    0 238.5G  0 disk 
├─sda1               8:1    0  1007K  0 part 
├─sda2               8:2    0   512M  0 part 
└─sda3               8:3    0   238G  0 part 
  ├─pve-swap       253:0    0     8G  0 lvm  [SWAP]
  ├─pve-root       253:1    0  59.3G  0 lvm  /
  ├─pve-data_tmeta 253:2    0   1.6G  0 lvm  
  │ └─pve-data     253:4    0 151.6G  0 lvm  
  └─pve-data_tdata 253:3    0 151.6G  0 lvm  
    └─pve-data     253:4    0 151.6G  0 lvm  
sdb                  8:16   0   1.8T  0 disk 
sdc                  8:32   0   1.8T  0 disk 
sdd                  8:48   0   1.8T  0 disk 
sde                  8:64   0   1.8T  0 disk 
sdf                  8:80   0   1.8T  0 disk 
root@proxmox:/#

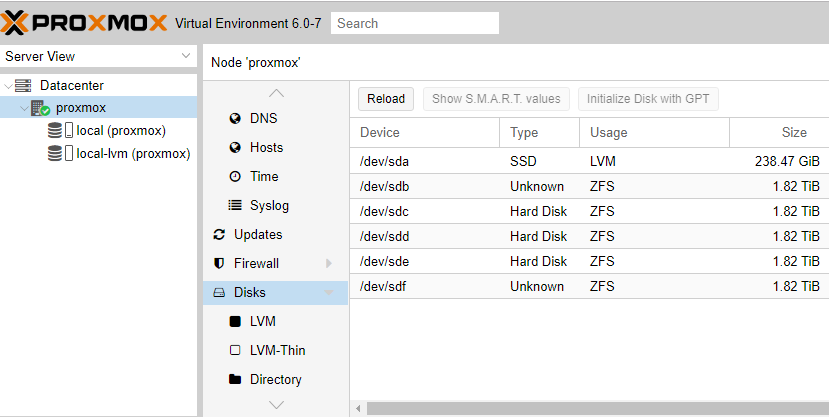
Format each disk from sdb – sdf

root@proxmox:/# /sbin/fdisk /dev/sdb

Welcome to fdisk (util-linux 2.33.1).
Changes will remain in memory only, until you decide to write them.
Be careful before using the write command.

Command (m for help): g
Created a new GPT disklabel (GUID: CF141939-59BA-2C40-AC12-75A379E67B22).

Command (m for help): w
The partition table has been altered.
Calling ioctl() to re-read partition table.
Syncing disks.

root@proxmox:/#

3. Create ZFS pool.

root@proxmox:/# /sbin/zpool create local-zfs /dev/sdb /dev/sdc /dev/sdd /dev/sde /dev/sdf 
root@proxmox:/# /sbin/zpool status
  pool: local-zfs
 state: ONLINE
  scan: none requested
config:

        NAME        STATE     READ WRITE CKSUM
        local-zfs   ONLINE       0     0     0
          sdb       ONLINE       0     0     0
          sdc       ONLINE       0     0     0
          sdd       ONLINE       0     0     0
          sde       ONLINE       0     0     0
          sdf       ONLINE       0     0     0

errors: No known data errors
root@proxmox:/#

4. Verify the pool is created.

5. Add the ZFS pool to proxmox. Go to Datacenter -> Storage -> add -> ZFS

Choose ZFS pool we created at step.3 then add

Verify our news storage is enabled and active. 🙂

Fix proxmox repository is not signed.

14 Oct
October 14, 2019

This problem occurred because we are free user without proxmox enterprise subscription and this prevent us from update or install new package. Here’s how to fix it.

1. Comment out proxmox enterprise source.

root@proxmox:/# vim /etc/apt/sources.list.d/pve-enterprise.list
#deb https://enterprise.proxmox.com/debian/pve buster pve-enterprise

2. Add new proxmox source. Delete old one and put in new source.

root@proxmox:/# vim /etc/apt/sources.list
deb http://ftp.debian.org/debian buster main contrib
deb http://ftp.debian.org/debian buster-updates main contrib

# PVE pve-no-subscription repository provided by proxmox.com,
# NOT recommended for production use
deb http://download.proxmox.com/debian/pve buster pve-no-subscription

# security updates
deb http://security.debian.org buster/updates main contrib

3. Update new source list.

root@proxmox:/# apt-get update

Change default port in proxmox

14 Oct
October 14, 2019

There is no direct method to change default port in proxmox so we use iptables to redirect to desire port instead.

1. Find network interface to apply iptables rule in proxmox. In this case VM bridge 0 is the interface we should apply our iptables rule.

root@proxmox:/# more /etc/network/interfaces
auto lo
iface lo inet loopback

iface enp5s0 inet manual

auto vmbr0
iface vmbr0 inet static
	address 192.168.1.5
	netmask 255.255.255.0
	gateway 192.168.1.1
	bridge_ports enp5s0
	bridge_stp off
	bridge_fd 0

iface eno1 inet manual

iface wlp0s20u4 inet manual
root@proxmox:/#

2. Apply iptables rule to incoming network interface. We will change proxmox default port 8006 to 41568.

root@proxmox:/#iptables -t nat -I PREROUTING -i vmbr0 --dst 192.168.1.5  -p tcp --dport 41568 -j REDIRECT --to-ports 8006

3. Save iptables rules.

root@proxmox:/#apt-get install iptables-persistent
root@proxmox:/#/usr/sbin/netfilter-persistent save

การเปลี่ยน default mirror ของ kali linux เป็น mirror ไทย ku.ac.th

23 Sep
September 23, 2019

1. แก้ file sources.list

Kali $ vim /etc/apt/sources.list

2. ลบข้อมูลเดิมออกให้หมดแล้วใส่ code ข้างล่างลงไป

deb http://mirror1.ku.ac.th/kali/ kali-rolling main contrib non-free
deb-src http://mirror1.ku.ac.th/kali/ kali-rolling main contrib non-free

3. ทำการ update mirror ใหม่

Kali # apt update
Kali # apt upgrade
Hotel Villa Honegg

My certification path

30 Nov
November 30, 2018

GIAC มันต้อง renew ทุกๆ 4 ปี งั้นเอา 4 ตัวนี้ละกัน renew ไปเรื่อยๆ

GPEN – GIAC Penetration Tester
GCFA – GIAC Certified Forensic Analyst
GCIA – GIAC Certified Intrusion Analyst
GNFA – GIAC Network Forensic Analyst

FIX Windows 10 keeps adding Keyboard layouts without permission

04 Nov
November 4, 2018

I’m the one who have this problem for several month and tried many fix in the internet. Hope this help for anyone who has this problem 🙂

Problem:
Windows 10 always add keyboard layout that user didn’t intend to have it like in my case it’s always add UK keyboard layout:

Fix:
In order to fix this problem you have to do following steps:

  1. Go to setting > Time & Language > Region & Language > Administrative language setting
  2. Under Welcome screen and new user accounts make sure that there are no extra keyboard layout appear in the list
  3. Click OK and Restart PC. This should fix your problem.

****For Window 10 2004 and Later

  1. Go to Control Panel > Clock and Region > Region > Change date, time, or number formats
  2. Go to Administrative tab
  3. Click on Copy settings…
  4. Under Welcome screen and new user accounts make sure that there are no extra keyboard layout appear in the list
  5. Click OK and Restart PC. This should fix your problem.
© Copyright - HHGG It's 42