[SSH] use SSH keys for authentication to server with saved user and password
Use below command:
% ssh-copy-id -i ~/.ssh/mykey <user>@<host>Or
% ssh-copy-id -i ~/.ssh/id_rsa.pub <host>Use below command:
% ssh-copy-id -i ~/.ssh/mykey <user>@<host>Or
% ssh-copy-id -i ~/.ssh/id_rsa.pub <host>The syntax is
git clone -b 'tag' --single-branch --depth 1 https://github.com/git/git.gitFor example
git clone -b master --single-branch https://github.com/greenbone/openvas-smb.git
git clone -b gvmd-20.08 --single-branch https://github.com/greenbone/gvmd.git In administrator command prompt
lodctr /R
Sometimes when install or update Openvas. There is an error message on web browser indicate that “The request contained an unknown or invalid Host header”
The request contained an unknown or invalid Host header. If you are trying to access GSA via its hostname or a proxy, make sure GSA is set up to allow it.Here is how to solve this problem.
1. Edit /etc/default/openvas-gsa in the ALLOW_HEADER_HOST
root@host# vim /etc/default/openvas-gsa2. Uncomment the section and add your host.
# To allow <host> as hostname/address part of a Host header:
#
ALLOW_HEADER_HOST=PUT YOUR HOST NAME HERE
3. restarting gsad service with /etc/init.d/openvas-gsa restart
root@host# /etc/init.d/openvas-gsa restart4. Done. Verify the result in web browser.

1. Install
sudo apt-get install smartmontools2. Verify HDD support S.M.A.R.T
sudo /sbin/sudo smartctl -i /dev/sdesmartctl 7.1 2019-12-30 r5022 [x86_64-linux-5.3.10-1-pve] (local build)
Copyright (C) 2002-19, Bruce Allen, Christian Franke, www.smartmontools.org
=== START OF INFORMATION SECTION ===
Model Family: Western Digital Green
Device Model: WDC WD20EZRX-00D8PB0
Serial Number: WD-WMC4M0DF2257
LU WWN Device Id: 5 0014ee 6afbfdb12
Firmware Version: 80.00A80
User Capacity: 2,000,397,852,160 bytes [2.00 TB]
Sector Sizes: 512 bytes logical, 4096 bytes physical
Rotation Rate: 5400 rpm
Device is: In smartctl database [for details use: -P show]
ATA Version is: ACS-2 (minor revision not indicated)
SATA Version is: SATA 3.0, 6.0 Gb/s (current: 6.0 Gb/s)
Local Time is: Tue Mar 24 17:10:57 2020 +07
SMART support is: Available - device has SMART capability.
SMART support is: Enabled3. Test
sudo /sbin/smartctl -t <short|long|conveyance|select> -C /dev/sdesudo /sbin/smartctl -t long /dev/sdesmartctl 7.1 2019-12-30 r5022 [x86_64-linux-5.3.10-1-pve] (local build)
Copyright (C) 2002-19, Bruce Allen, Christian Franke, www.smartmontools.org
=== START OF OFFLINE IMMEDIATE AND SELF-TEST SECTION ===
Sending command: "Execute SMART Extended self-test routine immediately in off-line mode".
Drive command "Execute SMART Extended self-test routine immediately in off-line mode" successful.
Testing has begun.
Please wait 266 minutes for test to complete.
Test will complete after Tue Mar 24 21:27:39 2020 +07
Use smartctl -X to abort test.4. Verify result
sudo /sbin/smartctl -a /dev/sdeSMART Self-test log structure revision number 1
Num Test_Description Status Remaining LifeTime(hours) LBA_of_first_error
# 1 Short offline Completed without error 00% 7757 -root@user-pve:/home/user# /usr/sbin/zpool status -v
pool: user-storage
state: DEGRADED
status: One or more devices has experienced an unrecoverable error. An
attempt was made to correct the error. Applications are unaffected.
action: Determine if the device needs to be replaced, and clear the errors
using 'zpool clear' or replace the device with 'zpool replace'.
see: http://zfsonlinux.org/msg/ZFS-8000-9P
scan: scrub repaired 280K in 0 days 04:33:34 with 0 errors on Sun Jan 12 04:57:36 2020
config:
NAME STATE READ WRITE CKSUM
user-storage DEGRADED 0 0 0
raidz1-0 DEGRADED 0 0 0
sda ONLINE 0 0 0
sdb ONLINE 0 0 0
sdc ONLINE 0 0 0
sdd ONLINE 0 0 0
sde DEGRADED 0 0 74 too many errors
errors: No known data errors
root@user-pve:/home/user#
root@user-pve:/home/user# /usr/sbin/zpool clear user-storage sde
root@user-pve:/home/user# /usr/sbin/zpool status -v
  pool: user-storage
 state: ONLINE
  scan: scrub in progress since Sun Jan 19 19:17:39 2020
        10.7G scanned at 1.53G/s, 1.32M issued at 193K/s, 877G total
        0B repaired, 0.00% done, no estimated completion time
config:

        NAME          STATE     READ WRITE CKSUM
        user-storage  ONLINE       0     0     0
          raidz1-0    ONLINE       0     0     0
            sda       ONLINE       0     0     0
            sdb       ONLINE       0     0     0
            sdc       ONLINE       0     0     0
            sdd       ONLINE       0     0     0
            sde       ONLINE       0     0     0

errors: No known data errors
root@user-pve:/home/user# apt update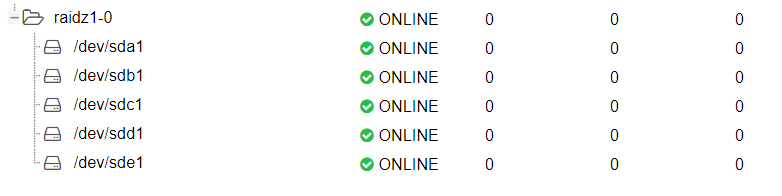
Had to comment away the following in the config file:
user@ubuntu:~$ sudo vim /etc/samba/smb.confComment out “map to guest = bad user” line.
# This option controls how unsuccessful authentication attempts are mapped
# to anonymous connections
#   map to guest = bad user
Restart samba service
user@ubuntu:~$ sudo /etc/init.d/smbd restartDone.
After kernel upgrade, ZFS couldn’t start, but some process create some file in the mount point. So after that ZFS can’t start the process ever again. Here’s how to fix.
1. disable service zfs.target and restart.
user@ubuntu:~$ sudo systemctl disable zfs.target2. after reboot delete or move data in mount point to another location.
3. enable service zfs.target and restart.
user@ubuntu:~$ sudo systemctl enable zfs.target4. after reboot move data back.
1. Download and update using dpkg -i <splunk package>.
user@Lnx:~$ sudo dpkg -i splunk-7.3.2-c60db69f8e32-linux-2.6-amd64.deb
[sudo] password for <user>:
(Reading database ... 235721 files and directories currently installed.)
Preparing to unpack splunk-7.3.2-c60db69f8e32-linux-2.6-amd64.deb ...
This looks like an upgrade of an existing Splunk Server. Attempting to stop the installed Splunk Server...
Stopping splunkd...
Shutting down.  Please wait, as this may take a few minutes.
..
Stopping splunk helpers...

Done.
Unpacking splunk (7.3.2) over (7.3.1) ...
Setting up splunk (7.3.2) ...
complete
user@Lnx:~$
2. Update and start service.
user@Lnx:~$ cd /opt/splunk/bin/
user@Lnx:/opt/splunk/bin$ sudo ./splunk enable boot-start
Do you agree with this license? [y/n]: yPerform migration and upgrade without previewing configuration changes? [y/n] y3. Restart Splunk service
user@Lnx:~$ sudo service splunk restart4. Visit splunk url on host.
http://127.0.0.1:51546Here is how to add harddisk into proxmox storage pool.
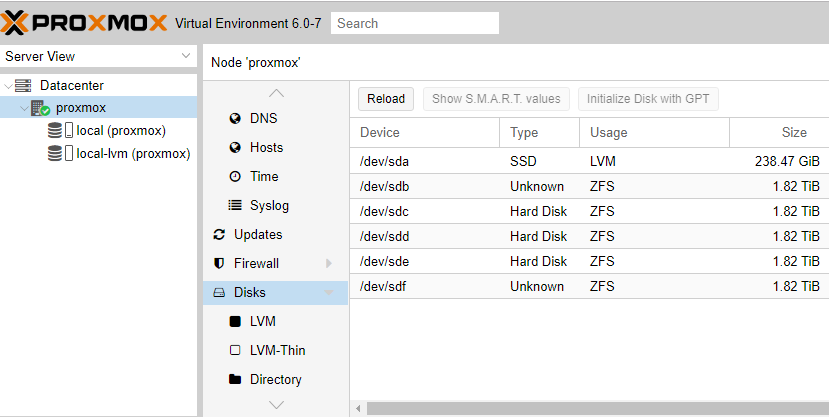
1. After we connect new hard disk to our host. Verify attached harddisk in proxmox.
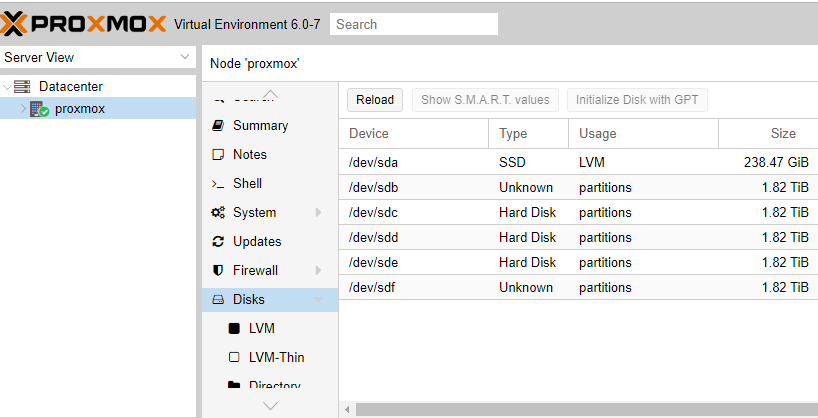
2. Format each harddisk. We will add sdb – sdf to our new storage pool.
root@proxmox:/# lsblk
NAME               MAJ:MIN RM   SIZE RO TYPE MOUNTPOINT
sda                  8:0    0 238.5G  0 disk
├─sda1               8:1    0  1007K  0 part
├─sda2               8:2    0   512M  0 part
└─sda3               8:3    0   238G  0 part
  ├─pve-swap       253:0    0     8G  0 lvm  [SWAP]
  ├─pve-root       253:1    0  59.3G  0 lvm  /
  ├─pve-data_tmeta 253:2    0   1.6G  0 lvm
  │ └─pve-data     253:4    0 151.6G  0 lvm
  └─pve-data_tdata 253:3    0 151.6G  0 lvm
    └─pve-data     253:4    0 151.6G  0 lvm
sdb                  8:16   0   1.8T  0 disk
sdc                  8:32   0   1.8T  0 disk
sdd                  8:48   0   1.8T  0 disk
sde                  8:64   0   1.8T  0 disk
sdf                  8:80   0   1.8T  0 disk
root@proxmox:/#
Format each disk from sdb – sdf
root@proxmox:/# /sbin/fdisk /dev/sdb

Welcome to fdisk (util-linux 2.33.1).
Changes will remain in memory only, until you decide to write them.
Be careful before using the write command.

Command (m for help): g
Created a new GPT disklabel (GUID: CF141939-59BA-2C40-AC12-75A379E67B22).

Command (m for help): w
The partition table has been altered.
Calling ioctl() to re-read partition table.
Syncing disks.

root@proxmox:/#
3. Create ZFS pool.
root@proxmox:/# /sbin/zpool create local-zfs /dev/sdb /dev/sdc /dev/sdd /dev/sde /dev/sdf
root@proxmox:/# /sbin/zpool status
  pool: local-zfs
 state: ONLINE
  scan: none requested
config:

        NAME        STATE     READ WRITE CKSUM
        local-zfs   ONLINE       0     0     0
          sdb       ONLINE       0     0     0
          sdc       ONLINE       0     0     0
          sdd       ONLINE       0     0     0
          sde       ONLINE       0     0     0
          sdf       ONLINE       0     0     0

errors: No known data errors
root@proxmox:/#
4. Verify the pool is created.
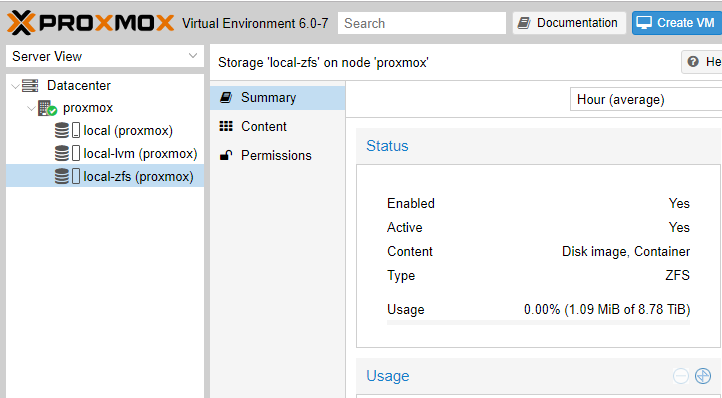
5. Add the ZFS pool to proxmox. Go to Datacenter -> Storage -> add -> ZFS

Choose ZFS pool we created at step.3 then add
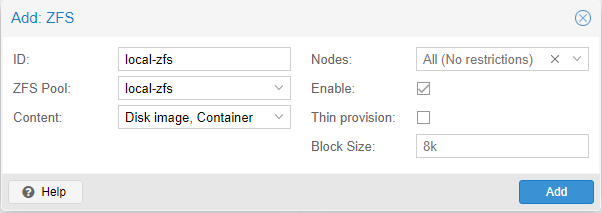
Verify our news storage is enabled and active. 🙂