[SSH] use SSH keys for authentication to server with saved user and password
Use below command:
% ssh-copy-id -i ~/.ssh/mykey <user>@<host>Or
% ssh-copy-id -i ~/.ssh/id_rsa.pub <host>Use below command:
% ssh-copy-id -i ~/.ssh/mykey <user>@<host>Or
% ssh-copy-id -i ~/.ssh/id_rsa.pub <host>root@user-pve:/home/user# /usr/sbin/zpool status -v
pool: user-storage
state: DEGRADED
status: One or more devices has experienced an unrecoverable error. An
attempt was made to correct the error. Applications are unaffected.
action: Determine if the device needs to be replaced, and clear the errors
using 'zpool clear' or replace the device with 'zpool replace'.
see: http://zfsonlinux.org/msg/ZFS-8000-9P
scan: scrub repaired 280K in 0 days 04:33:34 with 0 errors on Sun Jan 12 04:57:36 2020
config:
NAME STATE READ WRITE CKSUM
user-storage DEGRADED 0 0 0
raidz1-0 DEGRADED 0 0 0
sda ONLINE 0 0 0
sdb ONLINE 0 0 0
sdc ONLINE 0 0 0
sdd ONLINE 0 0 0
sde DEGRADED 0 0 74 too many errors
errors: No known data errors
root@user-pve:/home/user#
root@user-pve:/home/user# /usr/sbin/zpool clear user-storage sde
root@user-pve:/home/user# /usr/sbin/zpool status -v
  pool: user-storage
 state: ONLINE
  scan: scrub in progress since Sun Jan 19 19:17:39 2020
        10.7G scanned at 1.53G/s, 1.32M issued at 193K/s, 877G total
        0B repaired, 0.00% done, no estimated completion time
config:

        NAME          STATE     READ WRITE CKSUM
        user-storage  ONLINE       0     0     0
          raidz1-0    ONLINE       0     0     0
            sda       ONLINE       0     0     0
            sdb       ONLINE       0     0     0
            sdc       ONLINE       0     0     0
            sdd       ONLINE       0     0     0
            sde       ONLINE       0     0     0

errors: No known data errors
root@user-pve:/home/user# apt update
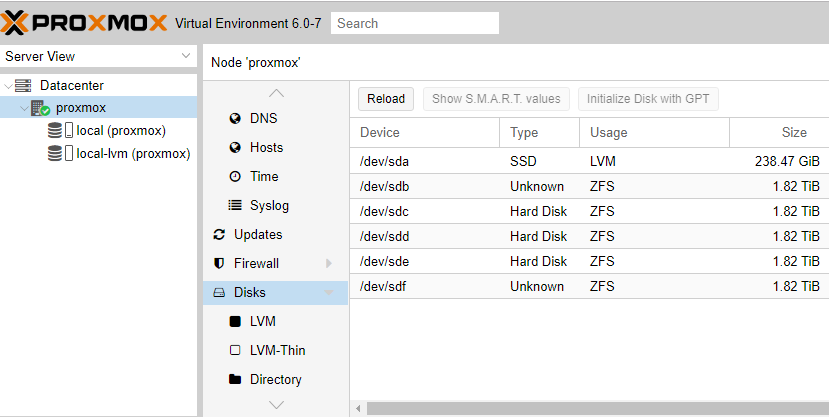
Here is how to add harddisk into proxmox storage pool.
1. After we connect new hard disk to our host. Verify attached harddisk in proxmox.
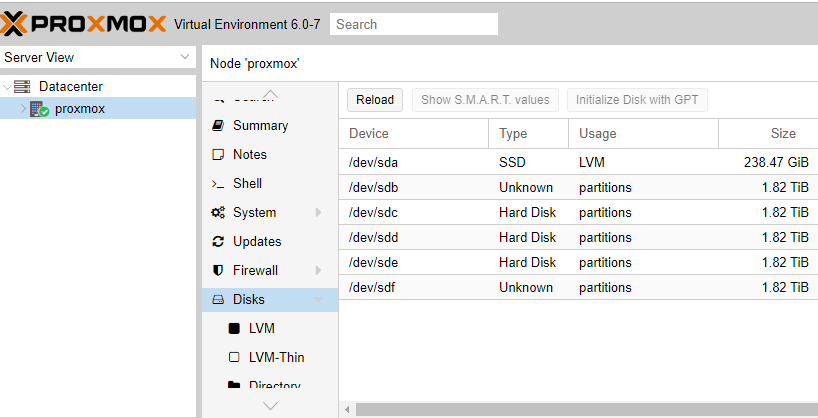
2. Format each harddisk. We will add sdb – sdf to our new storage pool.
root@proxmox:/# lsblk
NAME               MAJ:MIN RM   SIZE RO TYPE MOUNTPOINT
sda                  8:0    0 238.5G  0 disk
├─sda1               8:1    0  1007K  0 part
├─sda2               8:2    0   512M  0 part
└─sda3               8:3    0   238G  0 part
  ├─pve-swap       253:0    0     8G  0 lvm  [SWAP]
  ├─pve-root       253:1    0  59.3G  0 lvm  /
  ├─pve-data_tmeta 253:2    0   1.6G  0 lvm
  │ └─pve-data     253:4    0 151.6G  0 lvm
  └─pve-data_tdata 253:3    0 151.6G  0 lvm
    └─pve-data     253:4    0 151.6G  0 lvm
sdb                  8:16   0   1.8T  0 disk
sdc                  8:32   0   1.8T  0 disk
sdd                  8:48   0   1.8T  0 disk
sde                  8:64   0   1.8T  0 disk
sdf                  8:80   0   1.8T  0 disk
root@proxmox:/#
Format each disk from sdb – sdf
root@proxmox:/# /sbin/fdisk /dev/sdb

Welcome to fdisk (util-linux 2.33.1).
Changes will remain in memory only, until you decide to write them.
Be careful before using the write command.

Command (m for help): g
Created a new GPT disklabel (GUID: CF141939-59BA-2C40-AC12-75A379E67B22).

Command (m for help): w
The partition table has been altered.
Calling ioctl() to re-read partition table.
Syncing disks.

root@proxmox:/#
3. Create ZFS pool.
root@proxmox:/# /sbin/zpool create local-zfs /dev/sdb /dev/sdc /dev/sdd /dev/sde /dev/sdf
root@proxmox:/# /sbin/zpool status
  pool: local-zfs
 state: ONLINE
  scan: none requested
config:

        NAME        STATE     READ WRITE CKSUM
        local-zfs   ONLINE       0     0     0
          sdb       ONLINE       0     0     0
          sdc       ONLINE       0     0     0
          sdd       ONLINE       0     0     0
          sde       ONLINE       0     0     0
          sdf       ONLINE       0     0     0

errors: No known data errors
root@proxmox:/#
4. Verify the pool is created.
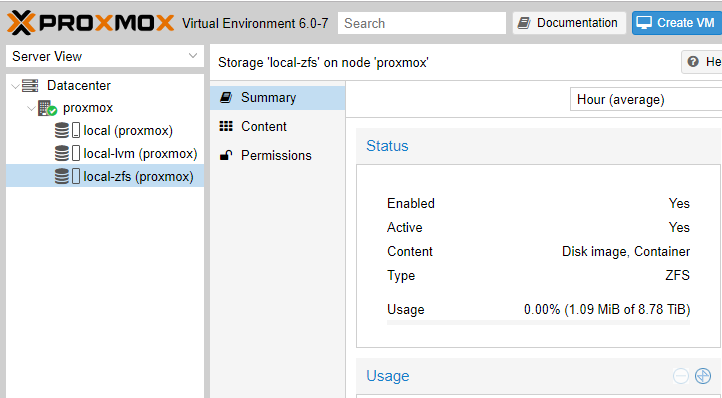
5. Add the ZFS pool to proxmox. Go to Datacenter -> Storage -> add -> ZFS

Choose ZFS pool we created at step.3 then add
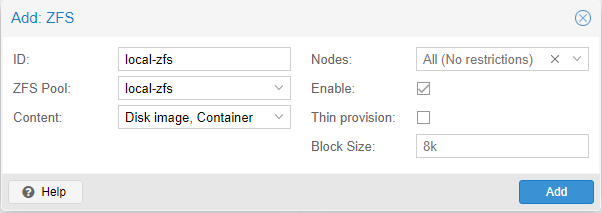
Verify our news storage is enabled and active. 🙂